How to create a CSR (Certificate Signing Request) in Plesk
Adding an SSL certificate in Plesk is a multi-step process. Understanding what SSL is and how it works will make this process much easier.
Understanding SSL
Overview
The basic steps to installing an SSL certificate include:
1. Create a CSR (Certificate Signing Request)
2. Submit the CSR to a Trusted Provider (also known as a Certificate Authority) and purchase the SSL.
3. Upload the SSL files to the server.
4. Apply the new certificate to your domain.
Create the CSR
Open Advanced Domain Options
Open the Advanced Options for the domain you’re going to add SSL to.
How to view Advanced Domain Options
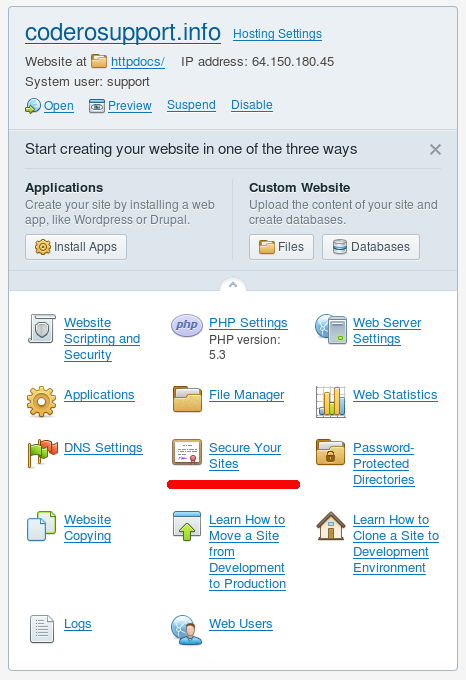
Click “Secure Your Sites”
Inside the Advanced Options, click the “Secure Your Sites”
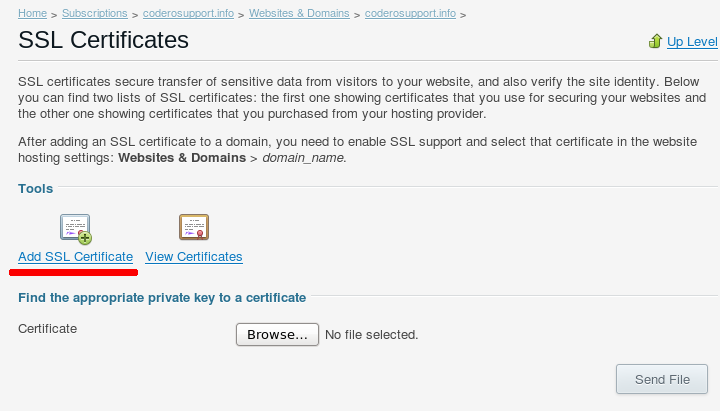
SSL Certificates
On the SSL Certificates page, under the Tools heading, click “Add SSL Certificate”
Add SSL Certificate
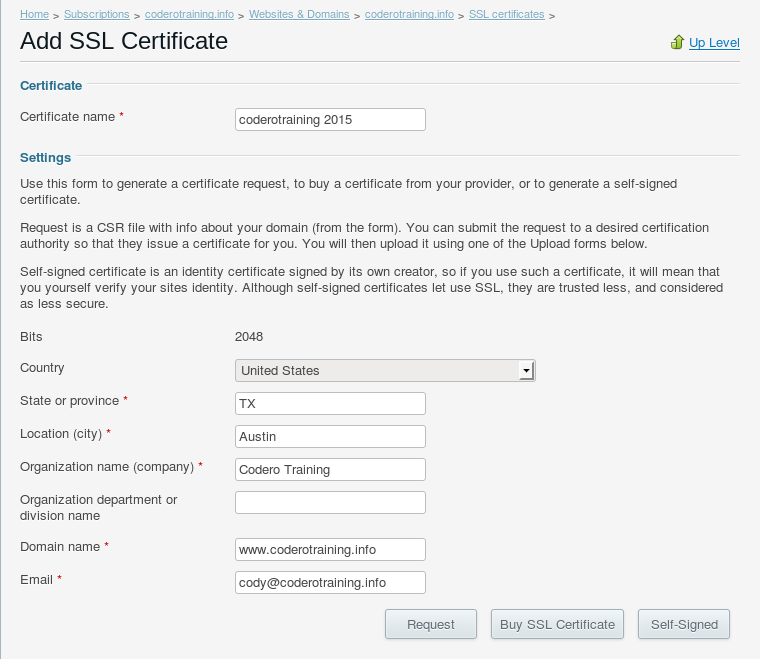
Under Add SSL Certificate, you’ll need to fill out the CSR Request form.
Certificate Name: Enter a unique name for the certificate. You can use any name you wish as long as it is unique. I recommend using the domain name and the current year.
Country: Select the country the business is based in from the dropdown box.
State or province: Enter the state or province of the business
Location (city): Enter the city the business is located in.
Organization name (company): Enter your business name.
Organization department or division name: This setting is optional. If you wish, you may enter a department. Examples might include IT, Marketing or Sales
Domain name: Enter the domain name. If you are applying the certificate to a specific subdomain (sales.domain.com or blog.domain.com), make sure you enter the exact subdomain.
Email: Enter your contact email address.
Once you have filled in the form, click .
Access Your CSR
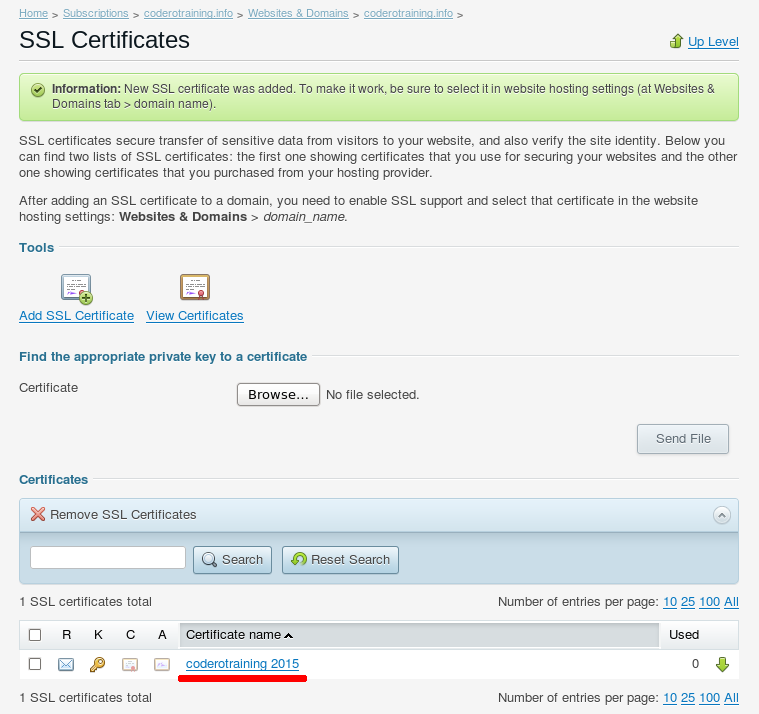
After your CSR is generated you will be returned to the SSL Certificates page with a notice saying the new SSL certificate was added.
To view the CSR, scroll down the page under Certificates and click on the certificate name you created in the previous step.
“Change Properties of SSL Certificate” Page
On the “Change Properties of SSL Certificate” page, scroll down the page until you see “CSR” . The text displayed starting with “- – – – – BEGIN CERTIFICATE REQUEST- – – – -” through “- – – – -END CERTIFICATE REQUEST- – – – -” is the text you will provide to a 3rd party certificate provider. Copy the entire text, including the Begin Certificate and End Certificate lines.
-----BEGIN CERTIFICATE REQUEST-----
 MIIC1DCCAbwCAQAwgY4xCzAJBgNVBAYTAlVTMQswCQYDVQQIEwJUWDEPMA0GA1UE
 ThIsIsAfAkeCeRtIfIcAte+dOnOtUsEtHiStExT/ThIsIsAfAkeCeRtIfIcAte+d
 LmNvZGVyb3RyYWluaW5nLmluZm8xJjAkBgkqhkiG9w0BCQEWF2NvZHlAY29kZXJv
 ThIsIsAfAkeCeRtIfIcAte+dOnOtUsEtHiStExT/ThIsIsAfAkeCeRtIfIcAte+d
 Ij1egAZp380U8gcUU99DQqTjrXOtc7PBEOg4jdIrpoII/K5SoaaJ7oyQH5TH4rDM
 ThIsIsAfAkeCeRtIfIcAte+dOnOtUsEtHiStExT/ThIsIsAfAkeCeRtIfIcAte+d
 bNSkZVi7zlv1Hmn3Gxo73ik64WwmWlNeylAFlmX15F5pT7sjXLWfynukBCh4fscF
 ThIsIsAfAkeCeRtIfIcAte+dOnOtUsEtHiStExT/ThIsIsAfAkeCeRtIfIcAte+d
 Aktmq2mSKWzlh1f0OVLYgjbf2SdqcQgDIf81D7U34q7tmL72bUdBbrjJiE2+9pa4
 ThIsIsAfAkeCeRtIfIcAte+dOnOtUsEtHiStExT/ThIsIsAfAkeCeRtIfIcAte+d
 fmLhurzt+e4m0fgl4gh8z/YjcmZaX9THQkHJxp0gd0A1xkm0SkvJ38QHwkuNpDBp
 Yx/CVhzfIzSi3yJuCwIDAQABoAAwDQYJKoZIhvcNAQEFBQADggEBAKxFgaWdqiws
 ThIsIsAfAkeCeRtIfIcAte+dOnOtUsEtHiStExT/ThIsIsAfAkeCeRtIfIcAte+d
 Gf4iV0WKen2Z9Ssu3nhESf/pt9WSZWsB6b0R8ZGROkDu1WZ60wgN1OvhQaSARqVX
 ThIsIsAfAkeCeRtIfIcAte+dOnOtUsEtHiStExT/ThIsIsAfAkeCeRtIfIcAte+d
 lUpupKEK5Q4=
 -----END CERTIFICATE REQUEST-----


Comments
So empty here ... leave a comment!